A MCP server is something an AI system can reach out to and actually do something with, unlike its usual diet of stale training data and existential boredom.
StickyMCP implements something refreshingly familiar: sticky notes. You type a short message, and it gets stored. Just like the real ones you stick on your coffee machine, desk surface, or whiteboard. Minimalism meets machine memory.
I built it during hackathon week, where ideas fly fast and only the sticky ones survive 🧷
Example: Using MCP Inspector to Display Text and Graph Output from the StickyMCP Server
StickyMCP is a lightweight MCP server that lets users create, list, and delete virtual sticky notes, stored in Azure Table Storage and rendered either as plain text or classic sticky note-style PNGs. It showcases how the Model Context Protocol (MCP) can power distributed, developer-friendly microservices with visual flair.
StickyMCP provides a clean API for managing notes across systems, integrates naturally with Visual Studio Code Copilot Chat, and supports both HTTP and STDIO transports.
Each note is stored in Azure Table Storage (with in-memory fallback) and rendered as:
Plain text (for automation and workflows)
PNG images (for dashboards, markdown previews, or collaborative tools)
🧪 Core Features
Add note
List all notes
Get note by ID
Delete note by ID
Delete all notes
Group notes by logical key (e.g., personal, work, ideas)
Render notes as PNGs
Use in-memory fallback if Azure is unavailable
HTTP or STDIO transport protocol
🖼️ Example Screenshots
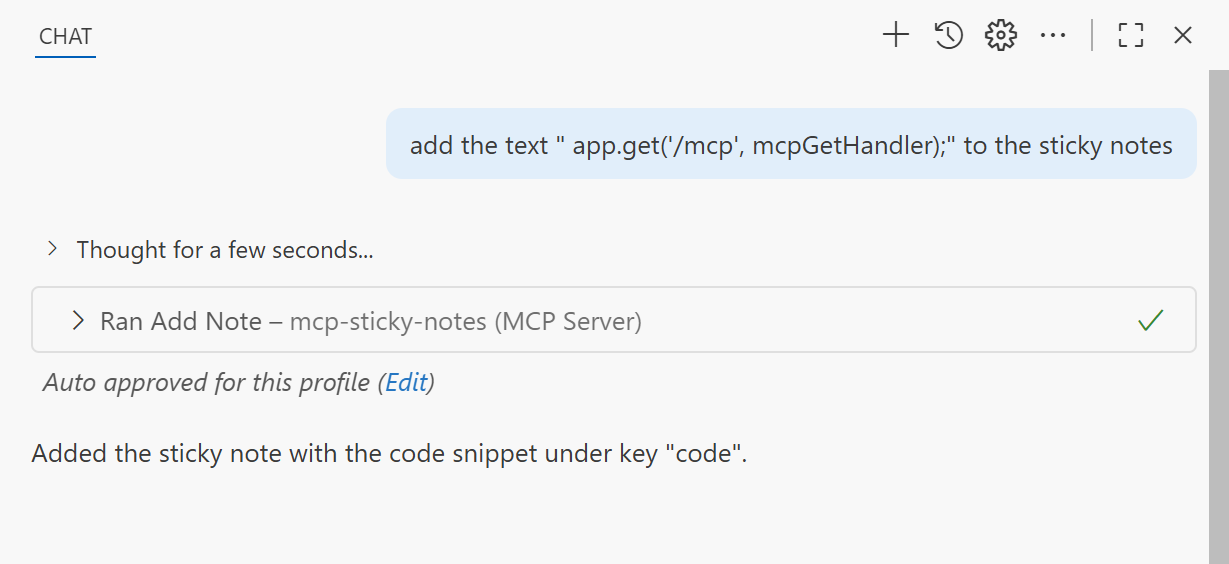
Add a Sticky Note from a Client
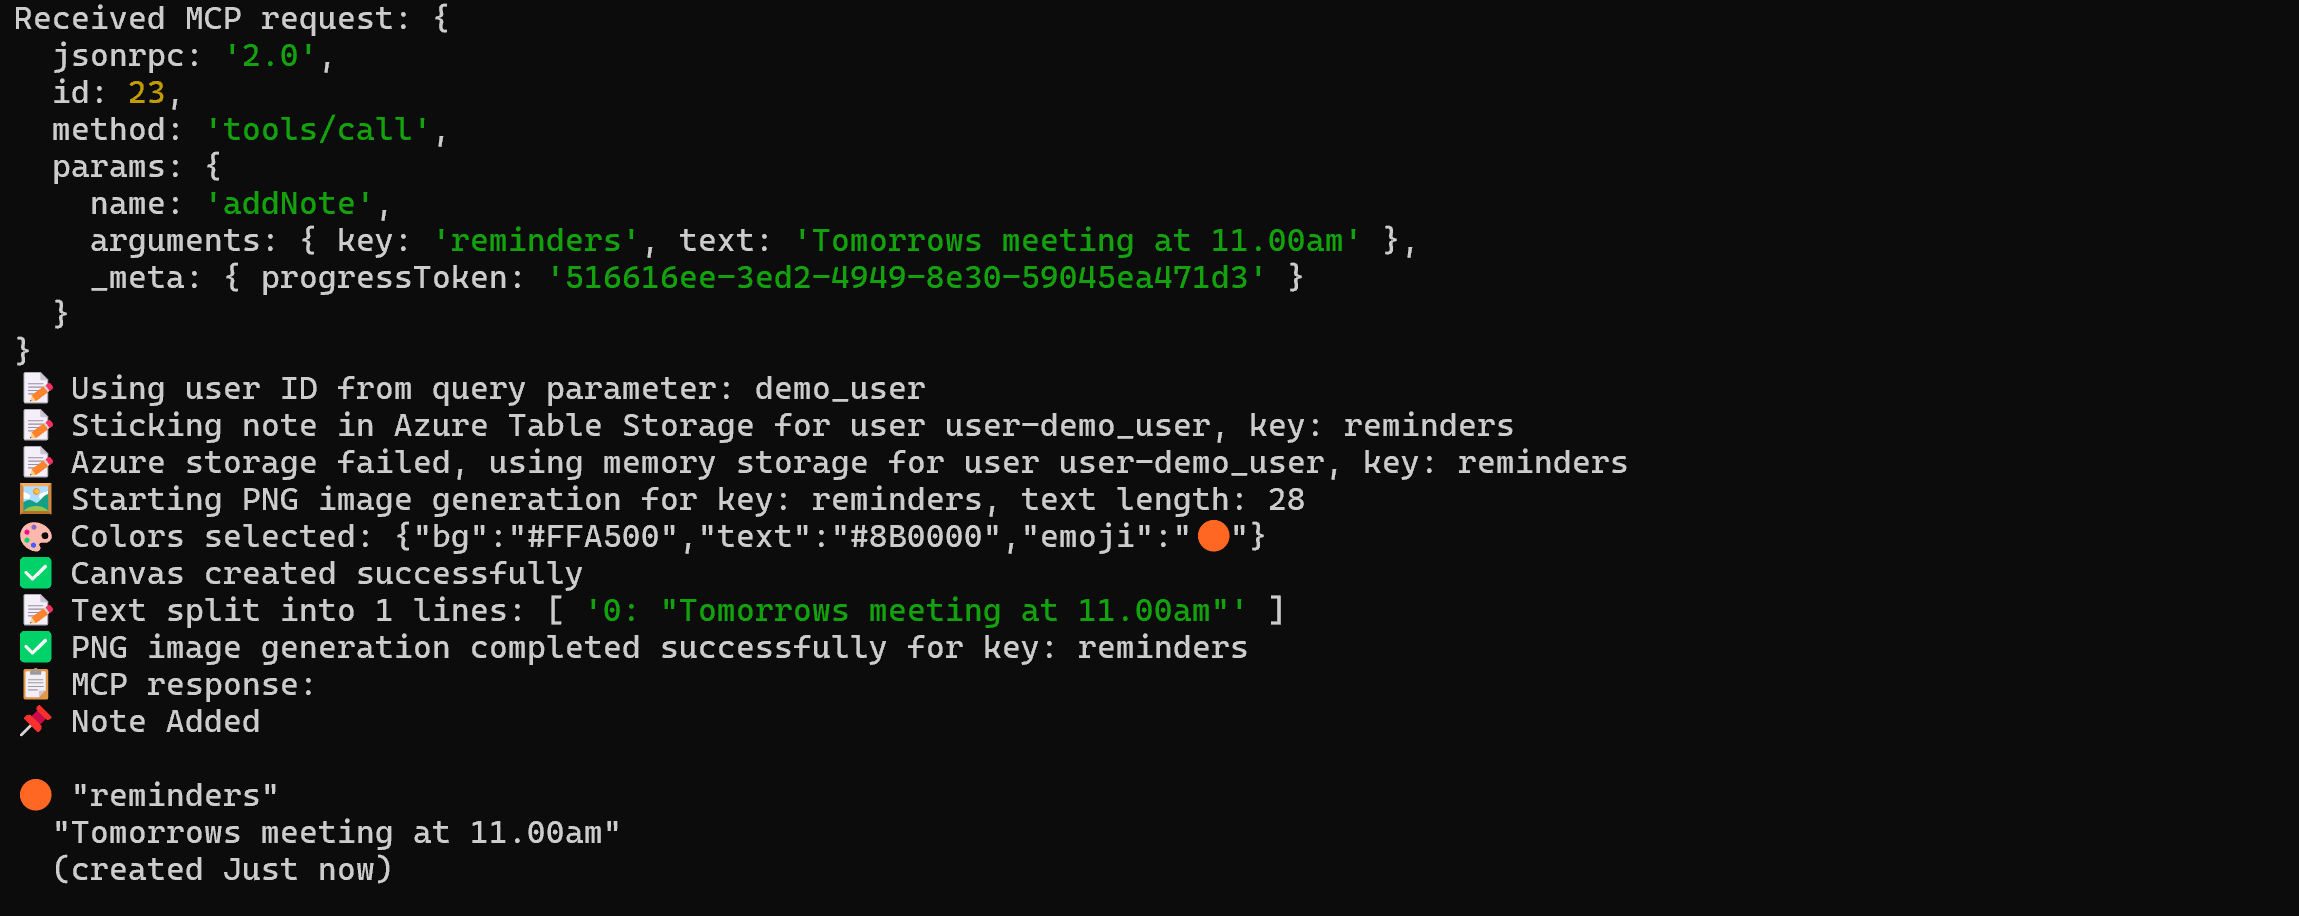
Console Logging for Adding a Sticky Note
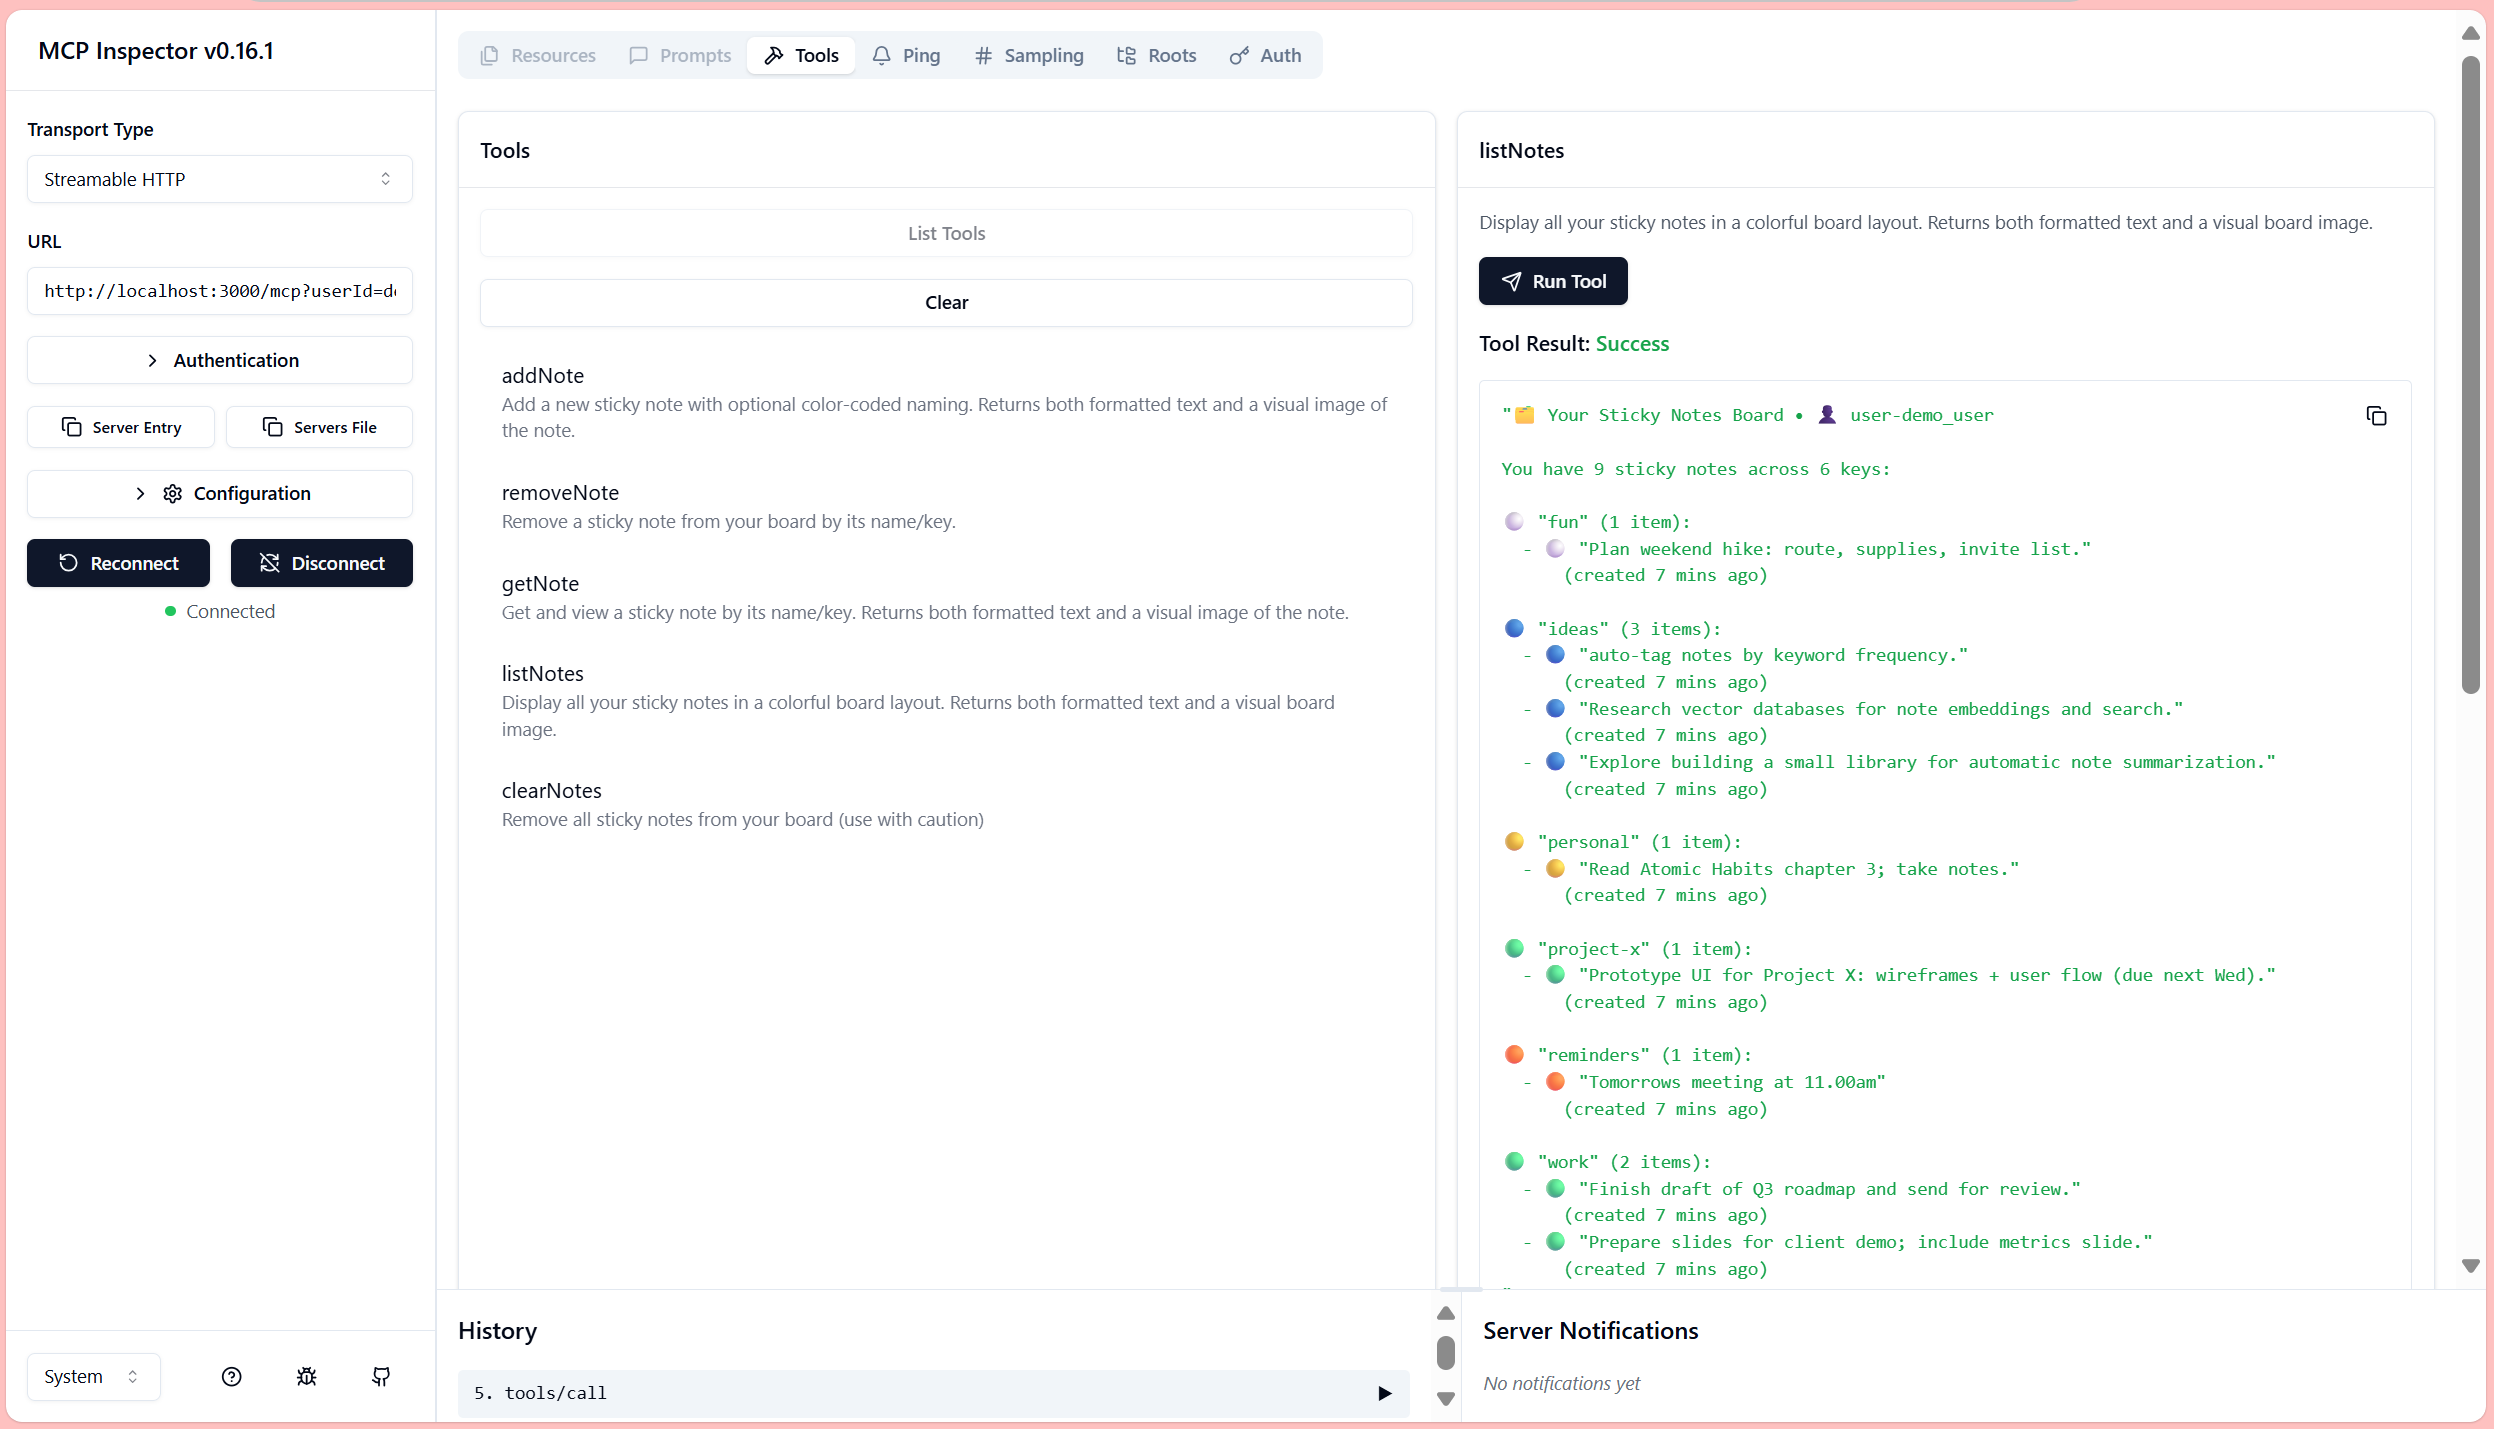
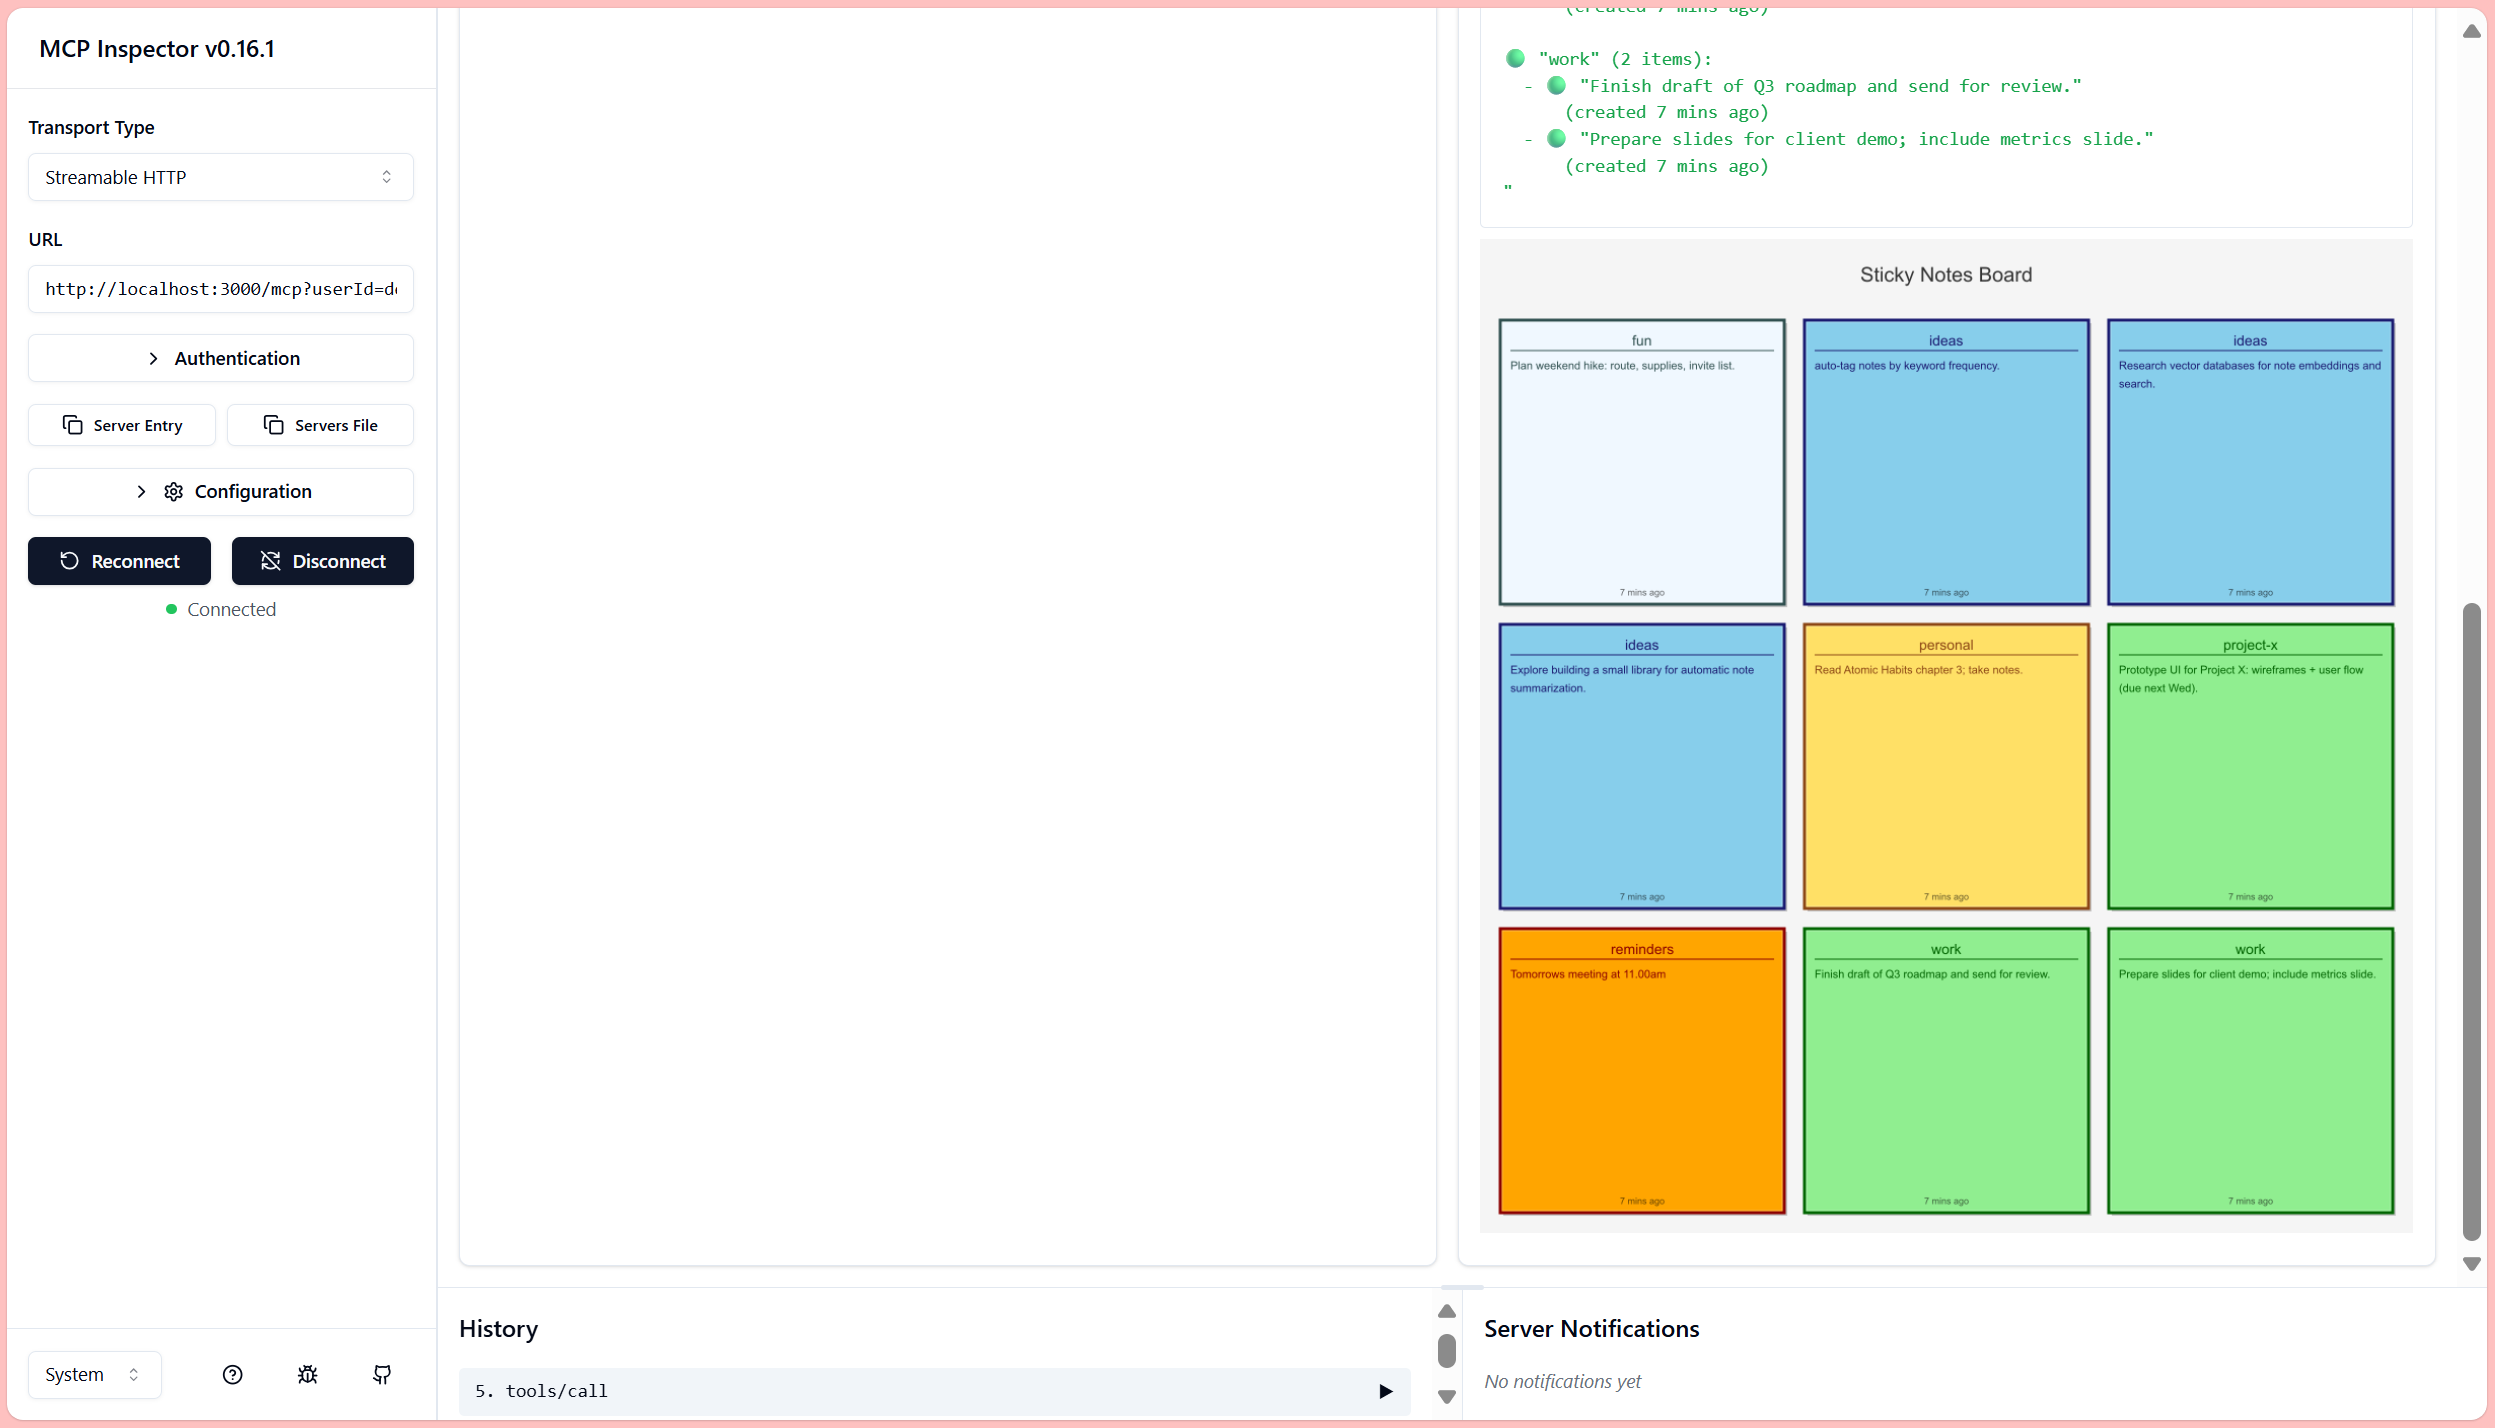
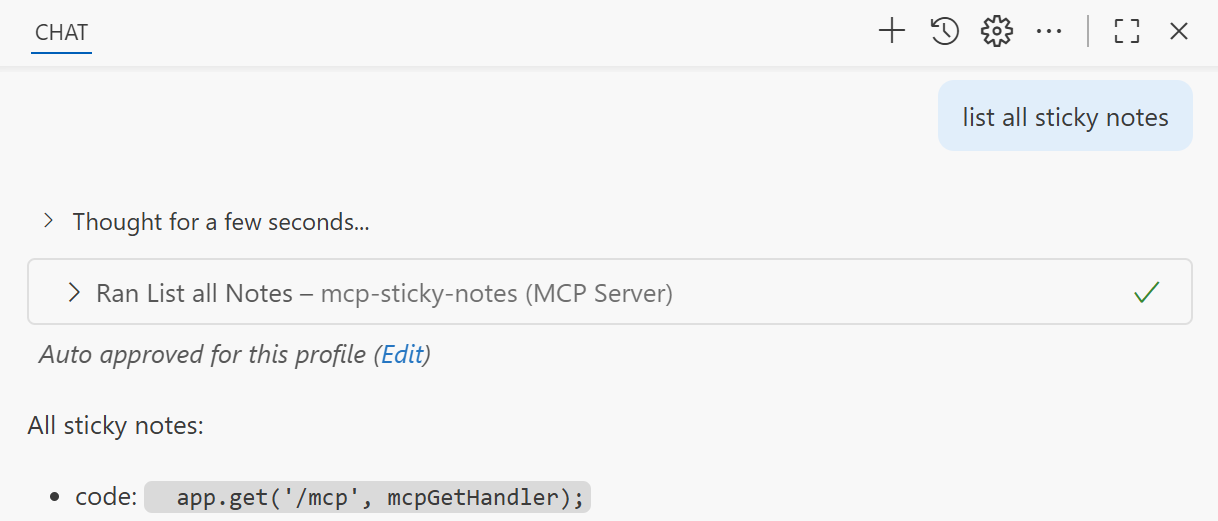
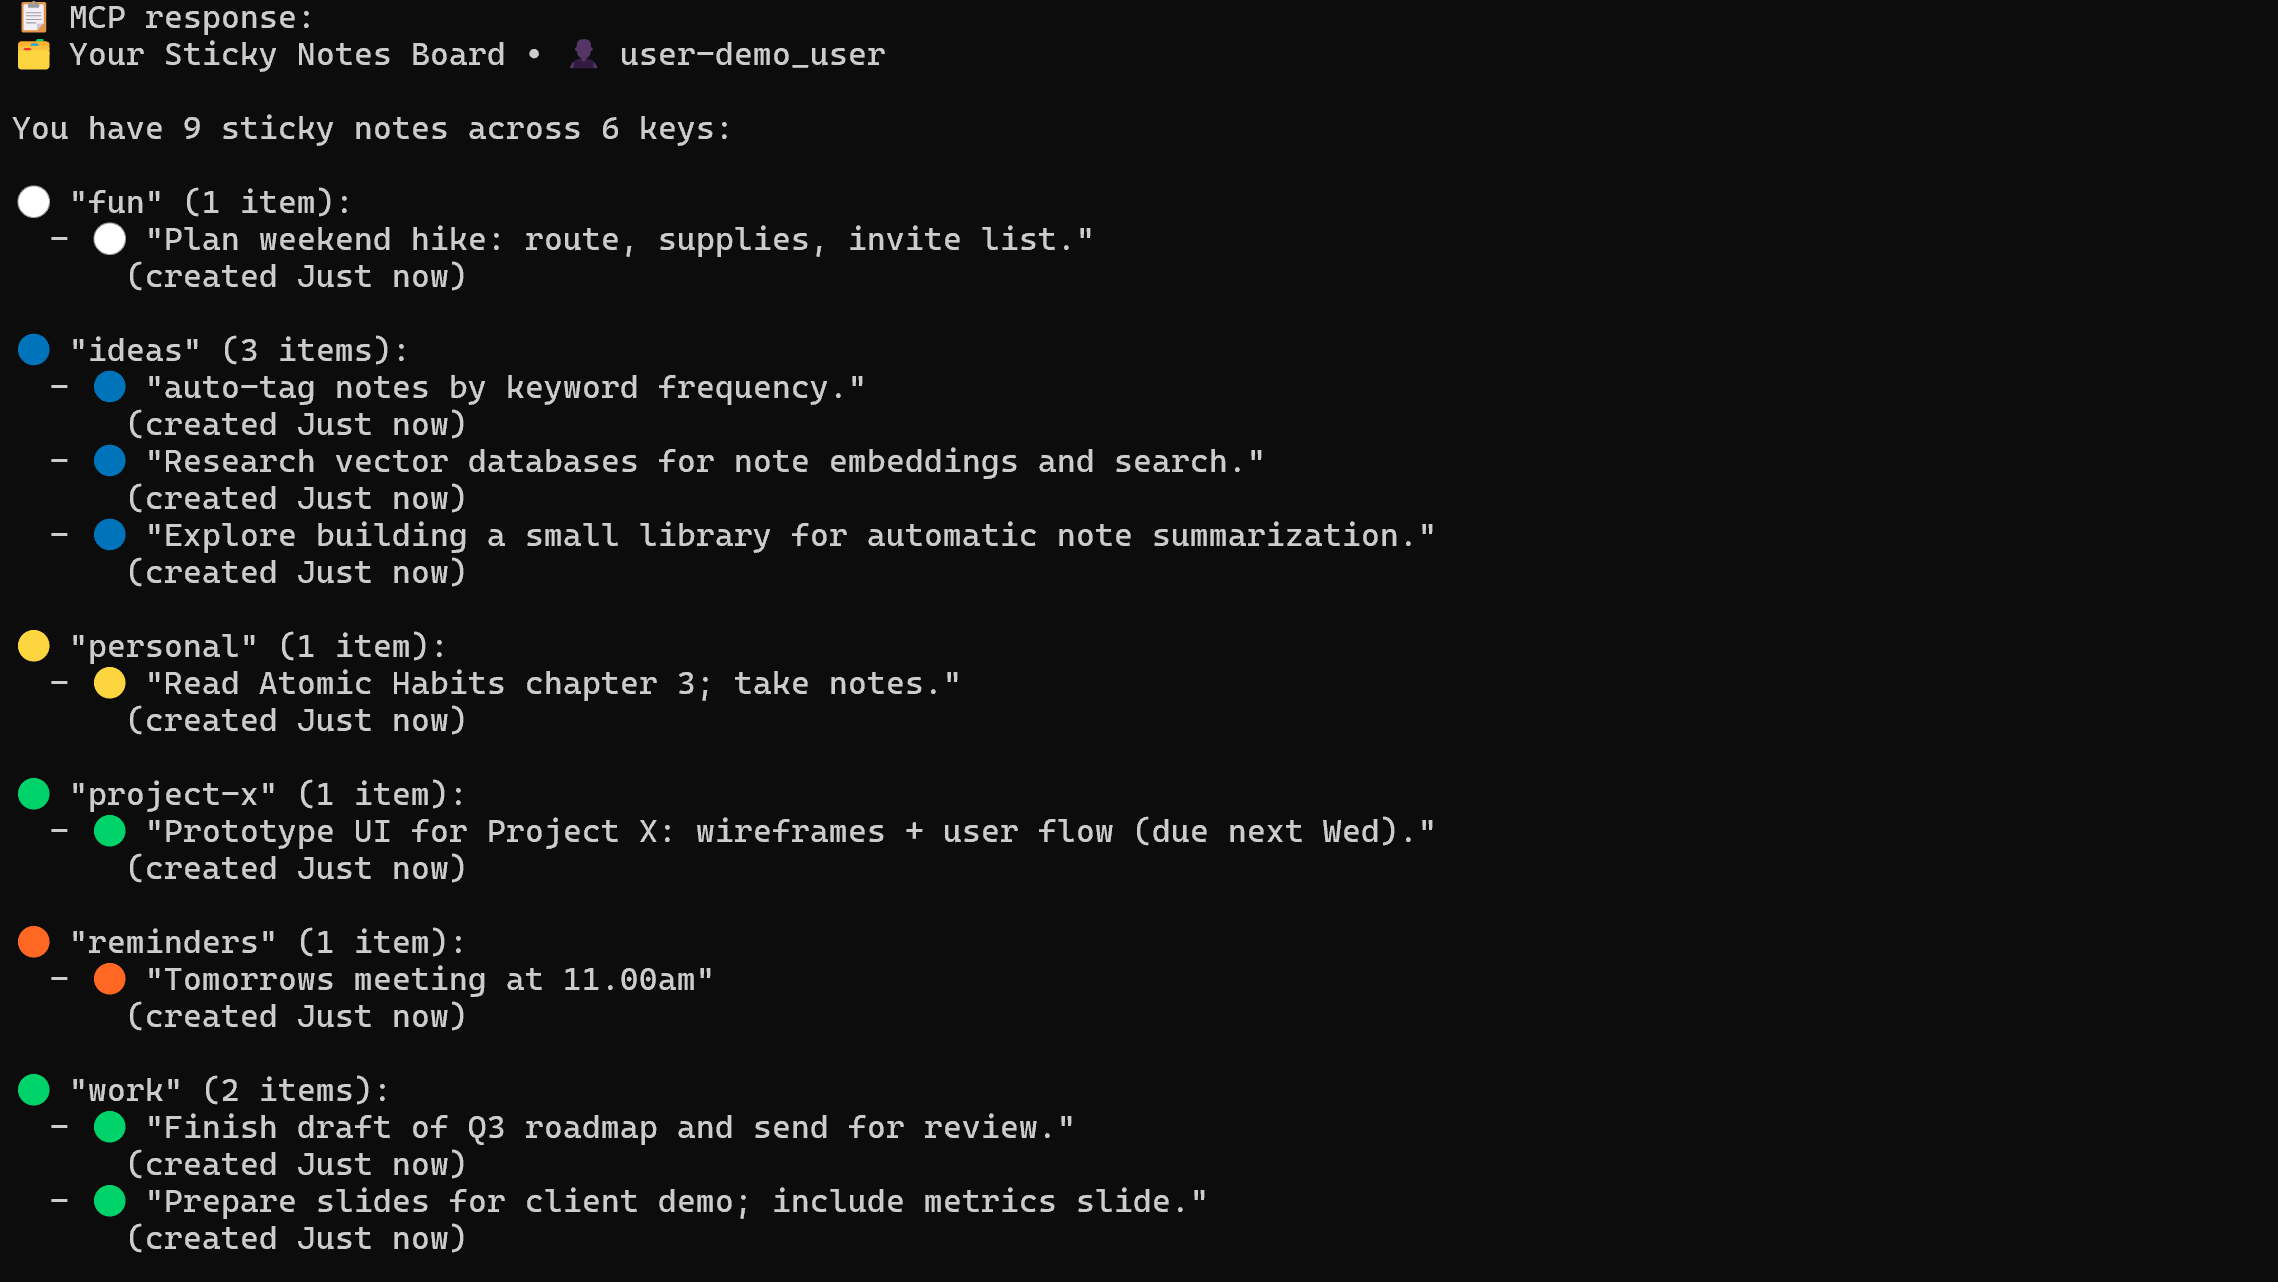
List all Sticky Notes from a Client
Console Logging for Listing All Sticky Notes
Short demo video showing how to add, list, and inspect sticky notes using MCP Inspector
Use the MCP Inspector to debug npx @modelcontextprotocol/inspector
Set command to http://localhost:3000/mcp?userId=demo_user
🌐 HTTP Endpoints
POST /mcp GET /mcp DELETE /mcp
MCP clients must initialize first to receive a mcp-session-id.
🖼️ Client Limitation for Images
Not all clients can display the generated PNG images. For example, Visual Studio Code Copilot currently does not render them. Until image support is available, visual results can be viewed using the MCP Inspector.
📍 Why It Matters
StickyMCP demonstrates how MCP can be used to build scalable, visually engaging microservices that integrate seamlessly with Azure and developer tools.
In a recent project, I encountered a performance bottleneck while using std::map with CString as the key. The keys represented file extensions, each not exceeding seven Unicode characters. Given the performance-critical nature of the loop, the overhead of hashing CString for such short sequences was suboptimal.
To address this, I used the __m128i data type, which is part of the Streaming SIMD Extensions 2 (SSE2) in C++. This data type allows for handling 128-bit wide integer vectors, making it ideal for the file extensions mapping within the 128-bit limit.
To use the __m128i data type, custom hash and equality functions need to be defined for the map.
Using this data type significantly reduced the overhead and improved the performance of the map operations within the critical loop.
Custom hash and equality functions
// Custom hash function for __m128i.
struct Hash128i
{
    std::size_t operator()(const __m128i& key) const
    {
        const uint64_t* data = reinterpret_cast(&key);
        return hash{}(data[0]) ^ hash{}(data[1]);
    }
};

// Custom equality function for __m128i.
struct Equal128i
{
    bool operator()(const __m128i& lhs, const __m128i& rhs) const
    {
        // Compare the __m128i values using integer comparison.
        const __m128i result = _mm_cmpeq_epi32(lhs, rhs);

        // Check if all elements are equal.
        return _mm_movemask_epi8(result) == 0xFFFF;
    }
};
__m128i CRegisterFormat::str_to_m128i(const WCHAR* obj)
{
    // Converts the first 8 characters of Unicode string obj into a __m128i.
    // Extension includes only a..z and 0..9, and 0..9 is case-insensitive,
    // and is at most 8 characters long.
    const size_t len = wcslen(obj);

    char pointy[16] = { 0 };
    memcpy(pointy, obj, min(16, 2 * len));

    // Initialize __m128i with the char array.
    const __m128i ext = _mm_loadu_si128(reinterpret_cast(pointy));

    // Case insensitve mapping.
    // The extension data is strictly A-Z0-9, so converting them to lowercase can be done by a vectorized operation bitwise OR with 0x20 (obj | 0x20). This moves A-Z to a-z while keeping 0-9, as this range already has this bit set.
    // Create a __m128i variable with all bytes set to 0x20.
    const static __m128i mask = _mm_set1_epi8(0x20);

    // Perform bitwise OR operation on all bytes.
    return _mm_or_si128(ext, mask);
}
Example usage
// Adding a new file extension with the associated function pointer for the file type.
const __m128i key(str_to_m128i(ext));
if(registered_format_plugins_map_m128.find(key) == registered_format_plugins_map_m128.end())
{
    registered_format_plugins_map_m128[key] = fp;
}

// Implement the format factory.
CPictureFormat* CRegisterFormat::GetInstance(const WCHAR* obj)
{
    const WCHAR* ext(wcsrchr(obj, L'.'));
    auto fp = registered_format_plugins_map_m128[str_to_m128i(ext)];

    if (fp)
        return fp();

    return NULL;
}

// Compare two extensions to check if they share the same group defined by matching function pointer.
bool CRegisterFormat::IsDifferentFormat(const WCHAR* obj1, const WCHAR* obj2)
{
    // Get the file extensions.
    const WCHAR* ext1(wcsrchr(obj1, L'.'));
    const WCHAR* ext2(wcsrchr(obj2, L'.'));

    if ((ext1 == NULL) != (ext2 == NULL))
        return true;

    return registered_format_plugins_map_m128[str_to_m128i(ext1)] != registered_format_plugins_map_m128[str_to_m128i(ext2)];
}
The C++ standard does not allow the usage of a function inside another function.
Instead, a lambda expression can be used to achieve this functionality.
For instance, it is not permissible to define this function within another function. However, you can achieve the same functionality by using a lambda expression as follows:
// function definition
BYTE grey_sum(int x, int y)
{
    const int index(3 * ((rect_y + y) * requested_data2.picture_width + rect_x + x));
    const BYTE grey(data[index]);
    return grey;
}
The lambda syntax starts with the capture clause [=] to have read access on all the variables in the scope (use an empty clause [] to access only local variables, or use [&] to use all the variables as references, or list explicitly which variables are used by value and which by reference, for example: [a, &b]), the argument list (int x, int y) and then the return type -> BYTE. The mutable specification and the exception specification are optional and not used here.
The lambda is then used like a function: grey_sum1 += grey_sum(x1, y1);
See this example from the AsciiArt plugin for cPicture (github link).
Using a traditional function would necessitate passing all local data as arguments, which can be inefficient. In contrast, a lambda expression provides a more streamlined and effective approach by capturing local variables directly within its scope.
    // Lambda to calculate the grey value.
    auto grey_sum = [=](int x, int y) -> BYTE
        {
            const int index(3 * ((rect_y + y) * requested_data2.picture_width + rect_x + x));
            const BYTE grey(data[index]);
            return grey;
        };

    // Read the rect segment at (rect_x, rect_y).
    for (register int y1 = 0; y1 < rect_h / 2; y1++)
    {
        for (register int x1 = 0; x1 < rect_w / 2; x1++)
            grey_sum1 += grey_sum(x1, y1);

        for (register int x2 = rect_w / 2; x2 < rect_w; x2++)
            grey_sum2 += grey_sum(x2, y1);
    }
    for (register int y2 = rect_h / 2; y2 < rect_h; y2++)
    {
        for (register int x1 = 0; x1 < rect_w / 2; x1++)
            grey_sum3 += grey_sum(x1, y2);

        for (register int x2 = rect_w / 2; x2 < rect_w; x2++)
            grey_sum4 += grey_sum(x2, y2);
    }

    const int rect_area4 = rect_area / 4;

    // Lambda to check if the contrast and brightness adjusted grey sum exceeds the threshold.
    auto match = [=](__int64 grey_sum) -> bool
        {
            return ((grey_sum / rect_area4 - 127) * (100 - contrast) / 100 + brightness + 127) <= 127;
        };

    // rect area is divided into 4 equal parts
    // 12
    // 34
    const bool b1 = match(grey_sum1);
    const bool b2 = match(grey_sum2);
    const bool b3 = match(grey_sum3);
    const bool b4 = match(grey_sum4);
For the EV diff plugin in cPicture, which calculates the exposure difference between pictures, I needed a simple aggregate to print the parameters used.
For example, the list values 1, 2 and 3 should be converted to the string "(1, 2, 3)". An aggregate function maps an enumerable type (vector) to a plain type (string). The function takes the vector, the toString lambda to convert individual vector elements to a string, and the start/end text and the separator.
I wanted to create a function similar to the Join-String function in PowerShell that is both simple and versatile. This is my implementation:
template<class T>
CString JoinString(typename vector<T>::const_iterator begin,
    typename vector<T>::const_iterator end,
    const function<CString(typename T)>& toString,
    const CString& startText,
    const CString& endText,
    const CString& separator)
{
    CString text(startText);

    for (typename vector<T>::const_iterator it = begin; it != end; ++it)
    {
        // Use the lambda to convert the template type data to text.
        text += toString(*it);

        // Skip separator for last element.
        if (it != end - 1)
        {
            text += separator;
        }
    }

    return text + endText;
}
The input is a vector of three ints which gets converted to a string that starts with an opening bracket '(', separates the elements with a comma ',' and ends with a closing bracket ')'. The toString lambda 'getText' converts the data to a string.
Google's online translation service is an easy way to translate text into any language.
For example:
[string]$text = "The picture."
online-translate "de" $text
The returned translation is "Das Bild."
Or:
[string]$text = "The picture search is finished. %1!d! pictures have been scanned and %2!d! duplicate pictures were found.\nWould you like to see the list with the duplicate picture names?"
online-translate "de" $text
The returned translation is "Die Bildsuche ist beendet. %1!d! Bilder wurden gescannt und %2!d! Es wurden doppelte Bilder gefunden.
Möchten Sie die Liste mit den doppelten Bildnamen sehen?"
Please note the unmodified placeholders (Ensure to use the REST API setting 'client=gtx').
This is all done with a PowerShell script using the public Google REST API:
<#
.DESCRIPTION
    Translate any text for a language using the google online translation service.
#>
function online-translate([string]$language, [string]$text) {

    # Escape newlines.
    $text = $text.Replace("`n", '\n')

    # The google rest API.
    [string]$uri = "https://translate.googleapis.com/translate_a/single?client=gtx&tl=$language&q=$text&sl=auto&dt=t"
    [string]$response = (Invoke-WebRequest -Uri $uri -Method Get).Content

    # Combine the segments of the response to a single string.
    # Regex is rather simple: Use the start pattern '[[["', or the segment pattern ']]]],["'
    # to capture the sentences in the text group.
    $m = ([regex]'(?:(?:^\[\[\[)|(?:\]\]\]\],\[))"(?<text>.*?)",".*?",null').Matches($response)
    [string]$translation = ($m | % { $_.groups['text'].Value }) -join ""

    # Adjust the translated text.
    $translation.Replace('\"', '"').Replace('\\n', "`n").Replace('\\r', "`r").Replace('[TAB]', "`t").Replace('\u003c', '<').Replace('\u003e', ">").Replace('\u003d', "=").Replace('\\\\', "\\")
}
The REST API response is more complex than the call itself, but with a simple regex this problem is easily solved in the function.
The starting pattern '[[["' or the segment pattern ']]]],["' is used to capture the sentences in the text group.
The number of segments depends on the text input. For example:
[[["Die Bildsuche ist beendet. ","The picture search is finished.",null,null,3,null,null,[[]],[[["84d48e73ebfa38d4d681515b81e0b72a","en_de_2023q1.md"]]]],["%1!d! ","%1!d!",null,null,3,null,null,[[]],[[["84d48e73ebfa38d4d681515b81e0b72a","en_de_2023q1.md"]]]],["Bilder wurden gescannt und %2!d! ","pictures have been scanned and %2!d!",null,null,3,null,null,[[]],[[["84d48e73ebfa38d4d681515b81e0b72a","en_de_2023q1.md"]]]],["Es wurden doppelte Bilder gefunden.\\nMöchten Sie die Liste mit den doppelten Bildnamen sehen?","duplicate pictures were found.\\nWould you like to see the list with the duplicate picture names?",null,null,3,null,null,[[]],[[["84d48e73ebfa38d4d681515b81e0b72a","en_de_2023q1.md"]]]]],null,"en",null,null,null,1,[],[["en"],null,[1],["en"]]]
chatGPT returns the result as a UTF-8 byte sequence in text form. Anything but ASCII 7-bit chars, for example any extended chars, languages with other scripts, will result in not readable text.
For example a result returned for the Spanish language:
This is done with the iso-8859-1 encoding. This will convert each char into a 8-bit representation, which then can be correctly decoded as UTF-8 to a Unicode string:
# Run chatGPT query.
$result = (Invoke-RestMethod @RestMethodParameter)

[string]$resultText = $result.choices[0].text
[byte[]]$byteContent = [System.Text.Encoding]::GetEncoding("iso-8859-1").GetBytes($resultText)

# Get the encoded result.
[string]$text = [System.Text.Encoding]::UTF8.GetString($byteContent)
Here is a full example on how to use chatGPT in PowerShell:
# https://platform.openai.com/account/api-keys
$apikey = "sk-....

<#
– Model [Required]
The ChatGPT got multiple models. Each model has its feature, strength point, and use case. You need to select one model to use while building the request. The models are:

text-davinci-003    Most capable GPT-3 model. It can do any task the other models can do, often with higher quality, longer output, and better instruction-following. It also supports inserting completions within the text.
text-curie-001      Very capable, but faster and lower cost than Davinci.
text-babbage-001    Capable of straightforward tasks, very fast, and lower cost.
text-ada-001        Capable of very simple tasks, usually the fastest model in the GPT-3 series, and lowest cost
#>

$requestBody = @{
    prompt      = "What is the capital of Germany?"
    model       = "text-ada-001"
    temperature = 1
    stop        = "."
} | ConvertTo-Json

$header = @{
    Authorization = "Bearer $apikey "
}

$restMethodParameter = @{
    Method      = 'Post'
    Uri         = 'https://api.openai.com/v1/completions'
    body        = $requestBody
    Headers     = $header
    ContentType = 'application/json'
}

# Run chatGPT query.
$result = (Invoke-RestMethod @restMethodParameter)

[string]$resultText = $result.choices[0].text
[byte[]]$byteContent = [System.Text.Encoding]::GetEncoding("iso-8859-1").GetBytes($resultText)

# Get the encoded result.
[string]$text = [System.Text.Encoding]::UTF8.GetString($byteContent)